My word is “breakthrough” and I think it will fit 2021 nicely, though who really knows what’s coming? There are so many unanswered questions. I choose to look at the new year positively, and intend to make it great, as great as I can!
I made a short art journal video to bring in the new year. Making art is good intention setting.
You can watch the process here:
my word for 2021
Reflecting back on 2020 it was a chaotic year for sure. I’m sure we can all agree. I got a lot accomplished in my art studio, and I was grateful to have that space to retreat to whenever I wanted. Not everyone is that lucky. My heart reaches out to those who were hard hit with the economic downturn, and most of all, those who had friends and relatives who passed away.
I wish a lot better year for everyone, and that we can find ways to get along better.
Here are some items I made in December:
The angel shrines are well loved by my customers. 🙂
If you need an angel for someone or yourself, please check out my shop Earth and Faery.
I wrote a blog post earlier this month with several other items I made, you can check out this post if you didn’t already, New Energy Coming…
Altered pages are a staple in art journaling, and I decided to experiment using a tub of modeling paste I just purchased. The paste has the consistency of creamy peanut butter and is easy to use. It’s important to clean up your tools quickly before it dries. It dries a lot harder than you’d think.
First, a thought: The best way to discover what kind of art expression you like to pursue is through experimentation. You learn quickly what you don’t like, and it takes you beyond copying others’ styles. I think it’s the best way to discover what makes you tick. That changes over time, so it’s good to be flexible.
Anyway, here are the three videos I made with altered papers.
Part 1: how I actually altered the papers.
Altering pages
Part 2: How I made some ornaments using the above papers.
Making ornaments
Part 3: Altered papers make a great journal cover!
Altered papers journal cover
As you can see, these papers are very flexible and forgiving too. You can’t mess up the project. Try it. If you buy some modeling paste you’ll enjoy using it in other projects. I made this mermaid picture with a sea background of paste.
Mermaid with modeling paste background
I pretty much used the same stencils in all the projects. You can use this technique for some many things!
Have a great creative rest of the week. 🙂
Lots of love,
Maria
P.S. I stocked some Halloween items in my shop recently, Earth and Faery.
Simple journal cover you ask? Yes, it’s possible. Check out the YouTube video I made creating an easy and fun cover for a new art journal. All you need is a manila envelope, I used a 12×9″ size, but any size is ok. You need some paints, elastic, and stencils or rubber stamps. Use what you have and save yourself a trip to the craft store.
front and back of journal cover
I really like how it turned out, and there are so many variations that you can create. The sky’s the limit. You can also put something in the envelope, use it as a secret pocket.
Simple is great! The more complex the design, the more room for error, though you can’t really go wrong when art journaling.
At a whole other spectrum of creativity, I sewed a cat figure from scrap fabrics.
cat soft sculpture
A friend saw it on Instagram and promptly purchased it. I was happy to part with it. I painted the eyes and appliqued them to the face. A lot of embroidery was involved, and I sewed the body without turning the seams inside. I thought it added a primitive touch to the figure.
Sometimes just winging it makes the best art. 🙂
What are you making today?
If you’re looking for some more inspiration, try this spirit doll assemblage made with an old Altoid tin. HERE
Lots of love,
Maria
P.S. I’m stocking some Christmas items (gifts) in my etsy shop. Check them out HERE.
Whimsical art and “funky boho colorful display” you can call these houses that are so much fun to make!
I wrote a picture tutorial on how to make them. It’s fun and easy! Here’s one:
whimsical art house
You can buy the wooden house shape at Michael’s or online. They are cheap and easy to alter. Since I was going to cover everything with paper, I Mod-Podged the surfaces to seal them before I attached paper scraps.
Paper scraps attached
Here the papers are dry. I covered the edges as well. You can glue the paper down and then cut the excess along the edges with sharp scissors.
All surfaces covered.
Below, I wiped acrylic paints over the surfaces, one pink one lavender.
I painted the door shapes, and in the image after that you can see the windows added. I used charcoal to outline the shapes in a primitive style.
Windows and doors added with paint and charcoal.
To seal the charcoal, which can be messy if not sealed, I used a spray varnish. It’s best to spray them outside because the fumes are wicked. I let the houses dry outside as well.
Drilled holes for birds
I then drilled the holes for the tiny birds I’d made as an embellishment on the roof. Whimsical touch… 🙂
Whimsical birds for the house roofs
I painted the houses the same colors on the back as on the front. The edges got a contrasting color.
Jazzed up the front with banners
When I make polymer clay tiles for my mosaics, I usually make some extra cut-outs. I use cookie cutters for these shapes, bake them, and paint them. They make cute banners! I also glued some flowers at the bottom on the pink house. I varnished the back and the edges with gloss varnish. The shine brings out the colors nicely.
Finished houses!Birds on the edges
I used super glue to attach the steel wire to the birds and the houses. They will stay in for a long time! 🙂
Below is another example of a green house.
Finished art house
Now I have to make more stars and pennants. I used them all in these projects.
Wood shapes are great because you can make so much with them. If you read my blog you know I like to combine wood and polymer clay. One of my most cherished sellers is the angel with a message.
Angel with a message
What gets your imagination going?
I get my inspiration from actually making stuff. One thing leads to another, new ideas pop up as I’m in the middle of the process. Most of them are good ideas that can be realized without too much pain. I also get inspiration from other artists on Instagram and Pinterest.
Don’t let fear stop you from experimenting. The figure below is my latest experimentation. I have a hard time sculpting faces, but I decided to use a face mold that I proceeded to alter. However, I keep working on my skills; it’s the only way to master a new technique.
Bettina, the circus acrobat on her day off
I wish you lots of inspiration! Try something new today. 🙂
My word for 2020 is faith. It takes a lot of faith to blaze new trails in the wilderness of creativity. I feel inspired to move on, create things I’ve never done before. First, I have a little inspiration for you, the process of my latest art journal spread:
My word for 2020
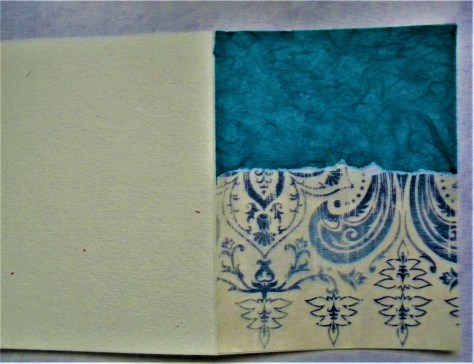
I started by applying a paper napkin to the bottom half of the pages, using Mod Podge. I separated the two layers of the napkin first, and the top layer was very thin, making awesome crinkles in the paper when I attached it to the page. I then painted the top part an unbleached white and used an old gift card to scrape some green over the dried paper napkin.
adding paper napkin
You can see the ridges in the napkin well, and where there is a paler area in the white paint where the Mod Podge acted as a resist, adding more interest to the page. I like how the flowers on the napkin shone through, making me think of spring.
Nice texture with a crinkled napkin
I added stems from my stash of paper. Friendship sayings were printed on the paper, and I thought they would add more interest to the art. I cut out flowers from other stashed junk and glued them all down.
cut out paper flowers
I enhanced the stems and flowers with black lines from a ballpoint pen and wrote down my word for the year. Simple but fun!
my word for 2020
I have dipped my toes into other media as in sewing. I’m obsessed with textile birds at the moment. Using two Ann Wood patterns that you can find at Annwoodhandmade.com, I made a songbird and an owl. Lots of fun, but also some frustration when things didn’t go so well.
Pink songbird
Sir Percival, the wise old owl
This debonair gentleman is called Sir Percival. He has lots of wisdom and goes his own way, but is always willing to offer a word of encouragement. He has lived a long life, and he likes to read books.
He’s fashioned from soft materials, but he’s not a toy. He’s an art doll enjoying lording it over other dolls, but he’s kind.
These two birds are for sale in my Etsy shop. You can find the owl HERE. The songbird is available HERE.
Apoxie Sculpt is of the most difficult materials I’ve worked with. I like the incredible hardness when dry, but it tends to be too soft, and if you wait, it gets too hard to work with. You only have a couple of hours of work time with the clay. I haven’t found the sweet spot yet.
I finished the bird I made a couple of weeks ago, painted two layers of paint and fixed the wobbly leg. It came out ok, but the turtle I made with the amethyst crystal did not end up as planned, but I’m learning. The clay is so different from polymer clay or paper clay. Since the end product is so much stronger, it’s worth learning how to handle it correctly.
The main thing is to have fun!
I hope you’re having fun this week. Make sure to add some creative practice to your day. Every day is a gift. Make it juicy!
If you missed my last post, here it is: Person or bird? I made some molded faces with Apoxie Sculpt and sewed them to fabric bodies. What do you think?
Mixed media cards are easy to put together. I have so many fabric and paper scraps that I could wallpaper an entire house! I often think about what to do with them as I don’t throw much away, especially the hand-painted fabrics. I have used most of them, so now I have mostly scraps. Why not make some handmade cards and give them along with the gifts to friends?
Two benefits from that: You have fun making the cards, and then passing on the joy (hopefully.) If they don’t like a handmade card, they can “gift it forward.”
The Queen of hearts
I came up with a combo of fabrics and paper to make this Queen of Hearts card. I have many watercolor paper pads, and I don’t paint with watercolors so I’m using the heavy-duty paper in many other ways.
I cut one 9×12″ sheet in half, and then I used a bone folder to press the two pieces of paper into cards. You can also buy blank cards with envelopes at the craft stores.
Mixed media base
I flattened the card and covered it with a paper background on one side. I like to use cool colors to create backgrounds, so I chose blue tones.
mixed media background
I used an old rubber stamp I have of a female face to print onto tan cotton with Stazon deep purple ink. The face looks grayer in the pictures.
mixed media face
To frame the face I needed bolder tones, so I layered some paper outlines. I started with black, and then used some gold wrapping paper as a halo. I added some paper light beams in yellow for more drama.
mixed media detailsmixed media details
I used some hand-painted fabric for the gown and attached it along with the face that I cut from the fabric.
mixed media cardmixed media embellishments
It’s all in the details!
I added small touches, like a red /pink heart, some “wings” and some do-dads at the bottom. I also decided to cut out a small bird from a piece of paper to attach across the top circle.
mixed media embellishments
Added drama
I used black Stazon ink to color the edges to give the card a faint frame. I used a light touch. I also outlined the bird and the heart with a ballpoint pen to make them more pronounced. As you can see, the red bits gave some spark to the card.
There she is, the Queen of Hearts. It’s a good idea to stamp some words inside the card or write a personal message. In my opinion, it makes a great gift to someone you care about, but I might be biased, haha. A suitable caption might be; “Queen for a day, Happy Birthday!”
I used the same watercolor paper to make this simple art journal. Check out the tutorial in this post: Make your Own Art Journals.
If you are in a crafty mode, check out my tutorial on how to make a Spirit Box.
If you feel like making a Spirit Doll, I have faces for sale you can use. They are available in my Etsy shop: Earth and Faery.
To provide the best experiences, we use technologies like cookies to store and/or access device information. Consenting to these technologies will allow us to process data such as browsing behavior or unique IDs on this site. Not consenting or withdrawing consent, may adversely affect certain features and functions.
Functional
Always active
The technical storage or access is strictly necessary for the legitimate purpose of enabling the use of a specific service explicitly requested by the subscriber or user, or for the sole purpose of carrying out the transmission of a communication over an electronic communications network.
Preferences
The technical storage or access is necessary for the legitimate purpose of storing preferences that are not requested by the subscriber or user.
Statistics
The technical storage or access that is used exclusively for statistical purposes.The technical storage or access that is used exclusively for anonymous statistical purposes. Without a subpoena, voluntary compliance on the part of your Internet Service Provider, or additional records from a third party, information stored or retrieved for this purpose alone cannot usually be used to identify you.
Marketing
The technical storage or access is required to create user profiles to send advertising, or to track the user on a website or across several websites for similar marketing purposes.