Category Archives: collage

April was a good and busy month

April was good though I went through a lot of changes with my art. I resisted painting my fantasy flowers even though they were fun and oh-so-colorful!

I always feel I should paint something else after painting five or six of the same motif. Do you feel that way too, or do you love to explore the same motif until you’ve excavated all that it can give you?

After these two paintings, I went in a slightly different direction:

Still flowers though, inspired by spring no doubt. Then I went in a different direction:

The still life was great fun, so I’ll explore more of that style in the future. It’s funny how art goes in various directions if you let it lead you. I feel that I’m always learning more, and that will never end.

I also had time to make some clay sculptures, which is always an effort in trial and error. This “cage” doll started out as a thrifted candleholder. It took me a while to finish, but I was happy with the result.

The one below is built around a blue agate geode. I used Apoxie Sculpt for both sculptures.

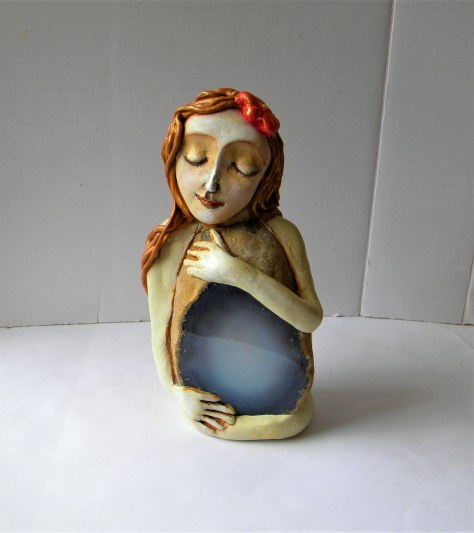
All of these items are available in my etsy shop Earth and Faery.

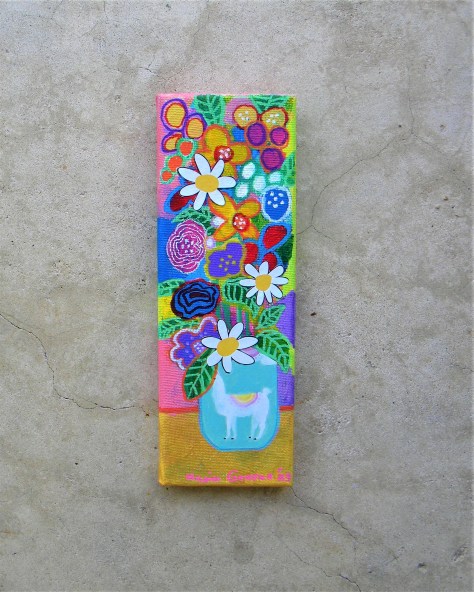
I also made some narrow flower paintings / collages, which was fun. I usually don’t paint tall and narrow, so it was a challenge.

We’re coming into the hot months here in Florida now, so I’ll be spending more time indoors to escape the heat. I’m pondering more art classes to add to my class site. I have two available now: How to Make a polymer clay whimsy girl, and How to Make a mosaic box with clay tiles.

You can check out those offerings HERE. I’m gathering supplies to make spirit dolls using my sculpted faces, and I’m thinking about designs. I will make several dolls in the course.

I made a simple, mostly no-sew, one a while back on YouTube that you can check out HERE.

What have you been working on lately? A day without making art is partially a wasted day in my opinion, but we do the best we can.

Lots of love and inspiration to you!

Whimsical art house tutorial

Whimsical art and “funky boho colorful display” you can call these houses that are so much fun to make!

I wrote a picture tutorial on how to make them. It’s fun and easy! Here’s one:

Whimsical art house tutorial.
whimsical art house

You can buy the wooden house shape at Michael’s or online. They are cheap and easy to alter. Since I was going to cover everything with paper, I Mod-Podged the surfaces to seal them before I attached paper scraps.

Paper scraps attached, art house tutorial.
Paper scraps attached

Here the papers are dry. I covered the edges as well. You can glue the paper down and then cut the excess along the edges with sharp scissors.

All surfaces covered, art house tutorial.
All surfaces covered.

Below, I wiped acrylic paints over the surfaces, one pink one lavender.

I painted the door shapes, and in the image after that you can see the windows added. I used charcoal to outline the shapes in a primitive style.

Windows and doors, art house tutorial.
Windows and doors added with paint and charcoal.

To seal the charcoal, which can be messy if not sealed, I used a spray varnish. It’s best to spray them outside because the fumes are wicked. I let the houses dry outside as well.

Drilled holes, art house tutorial
Drilled holes for birds

I then drilled the holes for the tiny birds I’d made as an embellishment on the roof. Whimsical touch… 🙂

Whimsical birds for the house roofs, tutorial.
Whimsical birds for the house roofs

I painted the houses the same colors on the back as on the front. The edges got a contrasting color.

Jazzed up the front with banners, art house tutorial.
Jazzed up the front with banners

When I make polymer clay tiles for my mosaics, I usually make some extra cut-outs. I use cookie cutters for these shapes, bake them, and paint them. They make cute banners! I also glued some flowers at the bottom on the pink house. I varnished the back and the edges with gloss varnish. The shine brings out the colors nicely.

Finished houses, art tutorial
Finished houses!
Birds glued to the edges, art house tutorial
Birds on the edges

I used super glue to attach the steel wire to the birds and the houses. They will stay in for a long time! 🙂

Below is another example of a green house.

Finished art house, art tutorial
Finished art house

Now I have to make more stars and pennants. I used them all in these projects.

Wood shapes are great because you can make so much with them. If you read my blog you know I like to combine wood and polymer clay. One of my most cherished sellers is the angel with a message.

Angel with a message

What gets your imagination going?

I get my inspiration from actually making stuff. One thing leads to another, new ideas pop up as I’m in the middle of the process. Most of them are good ideas that can be realized without too much pain. I also get inspiration from other artists on Instagram and Pinterest.

Don’t let fear stop you from experimenting. The figure below is my latest experimentation. I have a hard time sculpting faces, but I decided to use a face mold that I proceeded to alter. However, I keep working on my skills; it’s the only way to master a new technique.

Bettina, the circus acrobat on her day off

I wish you lots of inspiration! Try something new today. 🙂

Lots of love,

Maria

Fabric collage on boho bag

Fabric collage is one of my “things.” I have painted and dyed fabric over time and now have a nice stash of unique colors and styles to use for my fabric collages. These collages are usually attached to everyday usable items, which is a bonus.

Fabric collage makes a unique product that gets many ohhs and ahhs from (mostly) my fellow artists. No everyone likes a whimsical bag on their arm.

I got inspired with the last canvas mini bag and made a video of the process. To see how the other bags turned out, please check my two previous posts.

Exploring art on fabric.

Slow stitching and painting on a pouch.

For this last bag check out my YouTube video HERE.

fabric collage

I filmed and filmed and just as I was done, the camera batteries died. What perfect timing, huh?

You might ask how I dye fabric. There is always the conventional fabric dyes in the stores, but I like to make patterns and mix the colors.

I use mostly alcohol inks and diluted acrylic paints in spray bottles. I rinse out as much as I can, but the alcohol inks leave a pretty mighty color infusion. I use mostly cotton fabric because it absorbs the paints the best.

The acrylic paints usually embed themselves in the fabric, and when they dry, they are pretty stiff, but still flexible enough to use. I usually just spread the fabric on a drop cloth to dry.  Try different paints, and make sure they are color fast after drying, otherwise they will wash out.

I have added the four fabric collage bags / pouches to my etsy shop, Earth and Faery. 

There are many items in my shop at the moment since the holidays are coming.  I have felt a creative high for some weeks and I’m grateful for the flow. Sometimes I have long periods of no great inspiration, but I keep showing up in my studio. That’s what you do!

If you want some art journaling inspiration, I have a bunch of easy videos on YouTube under my name.  Keep creating. The process will  make you grow.

I wish you a creative and fun weekend!

Love,

Maria

Exploring art on fabric

Exploring art on fabric involves taking a step out of the comfort zone.  I bought four pouches with long handles online to experiment on.  They are heavy-duty canvas and would fit items like a phone, passport, a small wallet.

exploring art on fabric

I knew I needed to wash them to get the sizing out of the fabric but I was so eager to start that I side-stepped that important step and now I suffer the consequences. I wanted to make a background with inks and paint, so I did. The inks floated on top until I have kind of hand washed the pouch and got it more pliant. Note to self: always wash new fabrics….

The first exploration came out like this, and this is the back of the pouch.

exploring art on fabric

It’s not necessarily bad but the paint job came out too heavy-handed in my opinion. Another thing I didn’t like about these pouches, the handle was in two parts and tied with a knot. I had to unravel part of the seam, sew the ends together, and sew it back up again. You can see the seam in the picture. Nothing major, but more work for me.

I’m going to make some sort of applique like I did on this old art bag of mine in 2014.

exploring art on fabric

I’m thinking some sort of layering of fabric and embroidery.  Nothing too complicated since the bag is small, maybe some rustic birds…

This soap opera will continue with a picture of the finished product in my next post.

I did dye another pouch with blue ink and strong tea. It’s a more gentle approach, but I might add some more color before collaging the bag. It’s important to get all the wet parts done before any embroidery. I don’t want to contaminate the artwork with dyes and inks.

exploring art on fabric

Meanwhile, check out the items in my etsy shop. I add new things daily. For 10% off on my most popular item, the mosaic intention box, use coupon code TENOFF. The sale runs through October. EARTH AND FAERY.

Until next tine, create lots!!

Love,

Maria

P.S. Want to receive my email newsletter? Sign up HERE.