Tag Archives: art blog

April was a good and busy month

April was good though I went through a lot of changes with my art. I resisted painting my fantasy flowers even though they were fun and oh-so-colorful!

I always feel I should paint something else after painting five or six of the same motif. Do you feel that way too, or do you love to explore the same motif until you’ve excavated all that it can give you?

After these two paintings, I went in a slightly different direction:

Still flowers though, inspired by spring no doubt. Then I went in a different direction:

The still life was great fun, so I’ll explore more of that style in the future. It’s funny how art goes in various directions if you let it lead you. I feel that I’m always learning more, and that will never end.

I also had time to make some clay sculptures, which is always an effort in trial and error. This “cage” doll started out as a thrifted candleholder. It took me a while to finish, but I was happy with the result.

The one below is built around a blue agate geode. I used Apoxie Sculpt for both sculptures.
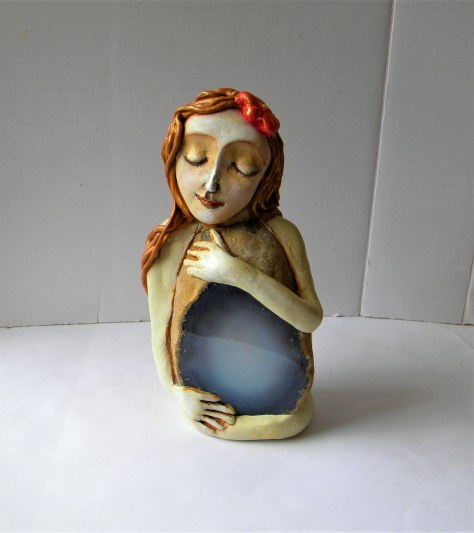
All of these items are available in my etsy shop Earth and Faery.

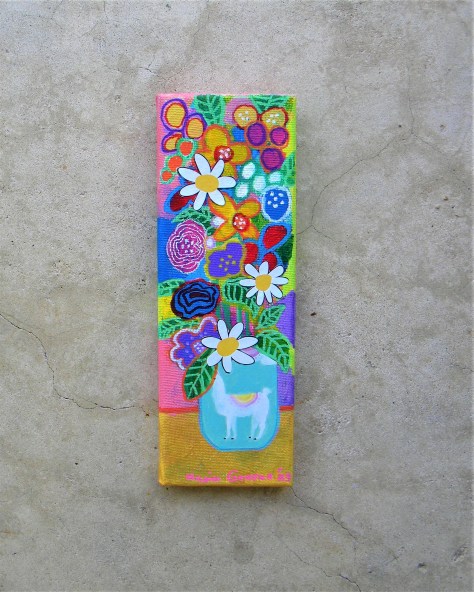
I also made some narrow flower paintings / collages, which was fun. I usually don’t paint tall and narrow, so it was a challenge.
We’re coming into the hot months here in Florida now, so I’ll be spending more time indoors to escape the heat. I’m pondering more art classes to add to my class site. I have two available now: How to Make a polymer clay whimsy girl, and How to Make a mosaic box with clay tiles.

You can check out those offerings HERE. I’m gathering supplies to make spirit dolls using my sculpted faces, and I’m thinking about designs. I will make several dolls in the course.

I made a simple, mostly no-sew, one a while back on YouTube that you can check out HERE.

What have you been working on lately? A day without making art is partially a wasted day in my opinion, but we do the best we can.

Lots of love and inspiration to you!

Fear of failure

Fear of failure anyone? I have experienced a lot of resistance lately as I’ve been stretching myself to create more complicated sculptures. I have always enjoyed making them, but if I make too many of the same style, I get bored. I have been wanting to make more Santos cage dolls, and I found some interesting “stands/cages” at a thrift store. They were probably part of wall sconces in the past, but I could see their potential.

Possibly a wall sconce in its prior incarnation

I used one of them for the first cage doll. To make them look a bit less modern, I wrapped and glued all the parts with sewing pattern paper.

Anything to make the process easier (than making a cage from scratch.) If you’re handy with wood and nails, go for the traditional cage. There are videos on YouTube.

The hardest part is to visualize the doll on top of the stand. I went for a longer dress but, traditionally, the cage is the “skirt.”

I use epoxy clay (Apoxie Sculpt brand) for these sculptures because it’s very strong.

The resistance/fear shows up questioning if the sculpture will be any good. Will I come up with a design I like? What if I waste all that pricey clay and have to scrap the project?

The doubting imp is always lurking on the outskirts of my mind. I am well-versed in the Fear of Failure! 🙂 There’s always uncertainty when you start a new project, especially if you have never made it before. They say that fear is the only thing that stops us from moving down untrodden paths. BUT, they also say that if you can visualize the project, it’s already done.

Fear of failure project

The choice is: do I go into the studio and start (or continue what I started?) Or… do I clean the fridge? There are always dirty areas to clean in the home.

The fear wins out often enough, and lately, I’ve had a very clean house, haha.

But, ultimately, the sculpture won’t go away, so I surrender to the process wherever it wants to take me. More often than not, the end result is okay, and if it isn’t, the sculpture can be used in another project. (Hope springs eternal…)

I have many ugly parts that I repurposed or took apart for elements for other projects.

The silver lining is: I learned something during the process that I can apply to future projects.

The more I listen to the urge to create “no matter what”, the more insights and experience I gather, and that’s priceless!

I leave the fridge cleanup for another day. That will always be there, but the exciting inspiration breeze from the muse fades away if I don’t use it.

Fear and resistance will never go away, but we can choose not to listen to them!

Uglee hands

I’m okay with this sculpture, but I need to work on fixing the hands and the hearts. One thing about Apoxie Sculpt, it is super soft when you mix the two parts together. I let it sit for about an hour before I use it, but then you have to work quickly. The good thing is you can build on top of the clay without a problem. I also have to attach another heart, and work on the one that “collapsed.” I will add another heart on top, and no one will be the wiser. 🙂

Have a wonderful, creative week.

Lots of love,

Maria

If you want to learn how to make one of these polymer clay sculptures, visit my Whimsy Girl workshop HERE.

Christmas in July

Christmas is still a few months away, but people seem to enjoy getting a head start on gift shopping, and this year might prove the same–or not. We live in strange times.

I was invited to join the Pfatt Marketplace (Prominent Folk Artist’s Trinkets and Treasures), and I just submitted my Christmas items for the July launch which happens on July 10. New items are for sale every month on the 10th. I enjoy trying out a new venue. I made some angels and a Christmas village. I will use my Etsy name, Earth and Faery there. You can check out the site HERE.

I have been busy this June and it feels good to be productive. I’ve had my eye on a set of metal fondant letter cutters at Michael’s and I finally took the plunge and bought them. I had no idea how they would work out on for my polymer clay, but I wanted to try. They come in a round tin and can be found in the baking department.

Fondant letter cutters
letter cutters

In the summer, the polymer clay gets sticky in the heat even though I keep it in the fridge. Once you roll it out it loses its chill. It was hard to get the clay out of the letters. I used the round end of a small brush to poke it through. It dented the clay, and some letters I could turn over, but the others I had to smooth out the best I could. I wasn’t too thrilled about the rounded edges of the letters for some reason.

It’s something you can try with your art.

Christmas in July peace sign.
Christmas in July

They pretty much took over the plaque, but I was pleased in general. I made specialty tiles with red, green, and gold paint, just to make it Christmas-y.

It has been 100 degrees here so it’s hard to get into any kind of Christmas feeling…

The last mixed media village I made sold out, but I have four more houses available now.

Besides making my mosaics, I’ve moved deeper into the rabbit hole of clay figures. I can tell you it’s so much fun! You should try making some. It’s not that hard.

The faces are the hardest part, but the more you practice, the better they get. I also add a little bird to every figure I make. I just like birds a lot. All of my figures are for sale. You can check out my inventory HERE. I add more things every day.

Now go and make some art! 🙂

Lots of love,

Maria

From drab to colorful

From drab to colorful is a transformation of an old painting into something new that better fits me as the artist I am today. Painting over an old painting does not give me a sense of doom, lol. I’m not attached to my paintings much. When they are done, they are mostly out of my consciousness.

The paintings I can’t sell, I paint over. The forgiveness of acrylic paints is great. No matter how many layers, the paint only looks richer each time.

This particular painting went through several huge changes, each stage very different. Here is the end result of the transformation, and the pictures of the old finished paintings.

from drab to colorful
The painting started here.

I painted this face back in the day, but it never left my studio. I then painted some layers on top and the white as a last layer. I saw two drinking glasses in the shapes, but I never liked that painting. It was too colorless for my liking,

Here are pictures of the progress that brought the art to its current state (as in the first picture above.)

I added lots of marks and details, and some “loud” drips that took over pretty much everything. Then I painted over most of them.

from drab to colorful

I was not happy with the blue ground and the flowers. They dominated everything else, so I diminished the blue, as you can see in the next picture.

from drab to colorful

In the above picture, I toned down the white outlines on the flowers. They are better, but I’m not totally happy with them–may be too big. I outlined the houses with charcoal to make them more pronounced. It ended up becoming a happy painting despite the giant flowers.

What if the painting doesn’t work out?

You never know how things will evolve, but you have to put yourself into the center of the action. Don’t agonize and wait, just try something. You can always fix what doesn’t work. The most important thing in creating is to take action, no matter how hard the fear pushes back.

Action = courage = more action = results.

Sometimes you have to work on a painting with courage you didn’t know you had. Results, whether they are good or bad, will happen. You never know until you try.

If you struggle with fear, here is a helpful post: Fear Holding You Back?

Here is another post: Procrastination is an Ugly Beast.

Have a great creative weekend!

Lots of love,

Maria

P.S. Check out my items for sale in my etsy shop, Earth and Faery. There are some fantastic gift ideas.