Tag Archives: polymer clay

The pros and cons of various art clays

The pros and cons become quite apparent as you work with the various clay brands. I’ll put down some insights here since I work a lot with the medium.

I started out with polymer clay, Sculpey III, which I still use a lot. There’s also Super Sculpey, which is a lot stronger than the Sculpey III. It usually comes in 1 lb blocks; I use it for figures and more complicated work.

The plus side of Sculpey is that it stays soft until you bake it, and you can work on it all day or even leave it for another day without worrying that it will dry out. The downside is the need for baking. Not that it’s a big con, but if you’re making sculptures (like I do,) you have to think of the inner armature. You can’t use anything that will melt at 275 degrees. If you do, the clay is likely to crack big time. (Been there, done that.) Also, if you live in a hot climate, the clay gets so soft as you work that you have to keep it in the fridge. When I need a chunk I have to run to the refrigerator– back and forth.

I have also made things out of air-dry clay, but the con is that it breaks pretty easily. I’ve made some spirit doll faces and bowls with it, but no sculptures. I tried the Plus brand from Joann’s, and it’s ok to work with but dries and cracks easily. I cover the item as it dries with a damp paper towel and that seems to help. I’ve also tried DAS, which is similar to Plus, but a step up in quality.

Recently, I took a clay sculpture class with Kathy Lewis, and she uses Jovi clay. I hadn’t even heard of it, but I ordered a block from Amazon. It smells like wet plastic, and it’s smooth to work with, but it tends to crack too, but not as bad as the other air dry clays. I guess practice makes perfect, but I don’t like repairing the figures. It makes me doubt that they are sturdy enough for sale.

I mostly work with Apoxie Sculpt, a super strong epoxy clay. Pros: it’s pretty easy to work with, but it takes practice. I have gone through several 2lb containers, and I’m ordering more! It smoothes easily to make a hard surface. It gives you confidence that the item won’t break easily. You can drill and sand it, and it takes paint well.

Cons: It’s expensive. You have to mix the two-part epoxy clay really well, and it takes a toll on your hands. You only have a couple of hours of work time before it hardens, and you can’t save leftover clay. I make small items with leftovers to add to other projects. I have used Apoxie Sculpt to fix items made with other clays.

Here’s an example of a bunny I rescued. I started out with Jovi clay, and as it dried, the arms fell off and some of the other details. I added epoxy clay arms, fixed the cracks, and enforced the delicate area between the head and ears. Jovi dries white, and the epoxy clay is gray as you can see in the picture below.

I also had a bunch of dry eyeballs made with epoxy clay to use (to prevent any flattening if working with air dry clay.)
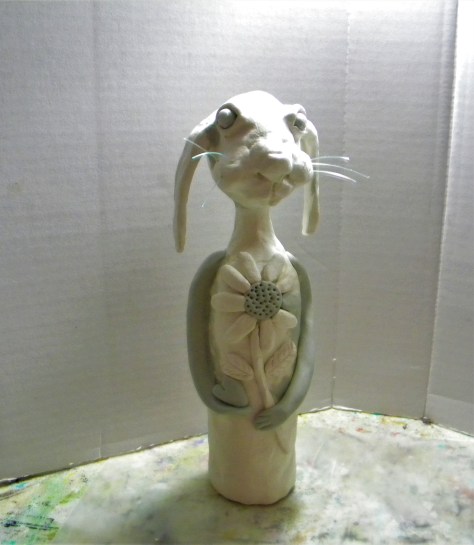
Below you can see the finished bunny, all painted and varnished. 🙂 It’s available for purchase in my etsy shop, Earth and Faery.

Here’s a link to Apoxie Sculpt on Amazon. (No affiliate.) You can also order it from the manufacturer: Aves Studio. It’s also available on Dick Blick. It also comes in smaller containers than the 2 lb tubs.

Conclusion: Sculpey is great for smaller items and is great for working details. I always use it for my mosaic tiles. I prefer epoxy clay to air-dry clay due to the cracking and easy breakage, but the preference is of course personal. I’d love to hear what your clay experience is like. 🙂

I have two classes using polymer clay: a whimsy girl and a mosaic tile box. Check them out.

Lots of love,

Why I love polymer clay

Why I love polymer clay? There are so many reasons, and I will try to mention some here.

Back in the day I read a book by Laurie Mika titled, Mixed Media Mosaics, and I was hooked! I made tray-loads of clay tiles and painted them. I adhered them to any flat surface that would hold them.

That’s how it all started, and then I began making 3D items, and even ventured into some clay jewelry (not many, but fun.)

Now I have branched out from polymer clay to epoxy clay for some items, and I like the challenge of “mastering” a new material.

Polymer clay is such a forgiving and easy-to-work-with material.

All you need is some elbow grease to soften the clay, a few simple tools, and an oven to bake it.

It became a fun challenge to look for things I could imprint on the clay, from vintage buttons to jewelry charms, rubber stamps, and things like bubble wrap and other trash items.

Here are a couple of examples of my recent clay work:

Polymer clay wall art where I used one of my painted faces.
Epoxy clay work, cosplay forest crown
Polymer clay hand sculpted spirit doll faces
Polymer clay faces for sale

I have branched out with my clay faces to include “elementals.” I have a fire elemental at the top of the picture, and also a Frost Queen, which is new to me.

Yesterday I got a wild hair and decided to make a video for my YouTube channel. Octopus eye on a key… hmm, sounds weird right? You can view it here:

Polymer clay octopus with eye on an old key

So I’ve moved from flat surfaces to explore more 3D styles, but mosaics will never get boring to make. Right now, people are into clay faces and making spirit dolls. Everything seems to go in cycles.

If you’re interested in spirit dolls, you can watch my video on how to make one. The link is in my PREVIOUS blog post.

I wish you lots of happy creativity, and if you’re in the market for a quirky gift, please check out my etsy shop, Earth and Faery.

Love, Maria

Mixed media with sea-loving flair

Mixed media is one of my go-to modalities when I want to experiment and have some fun in my art journal.

There are so many ways to add mixed media elements to your art, as many as you can imagine! 🙂

Mixed media is the essence of flexibility.

I made this art journal spread with some sea-loving flair. Mice are on an adventure and a mermaid is sending them some good vibes.

I haven’t been as busy as usual in my studio this month. Times have been kind of crazy, and my thoughts have been scattered a lot.

But I’m ready for Christmas, and there will be mixed media galore in my Etsy shop, but no art journaling there. 🙂

As you can see, I painted some pictures. I also tried my hand at some polymer clay brooches, which were a lot of fun, and a mermaid pendant. What do you think of these?

I made some more angels since they sell well in my shop.

If you are interested in any of these items, they can be purchased at Earth and Faery. There are about 150 items to choose from. I’m amazed at myself as I keep making stuff. When you’re inspired, everything flows!

If you missed my last post, Altered Pages Just for Fun, here it is. You can watch a three-part video tutorial on how to make altered pages with texture and paint. Then I show how to use them as ornaments and as a journal cover. CHECK IT OUT.

It’s always good to make some art in these crazy times. 🙂

My aim is to inspire.

Lots of love,

Maria

Christmas in July

Christmas is still a few months away, but people seem to enjoy getting a head start on gift shopping, and this year might prove the same–or not. We live in strange times.

I was invited to join the Pfatt Marketplace (Prominent Folk Artist’s Trinkets and Treasures), and I just submitted my Christmas items for the July launch which happens on July 10. New items are for sale every month on the 10th. I enjoy trying out a new venue. I made some angels and a Christmas village. I will use my Etsy name, Earth and Faery there. You can check out the site HERE.

I have been busy this June and it feels good to be productive. I’ve had my eye on a set of metal fondant letter cutters at Michael’s and I finally took the plunge and bought them. I had no idea how they would work out on for my polymer clay, but I wanted to try. They come in a round tin and can be found in the baking department.

Fondant letter cutters
letter cutters

In the summer, the polymer clay gets sticky in the heat even though I keep it in the fridge. Once you roll it out it loses its chill. It was hard to get the clay out of the letters. I used the round end of a small brush to poke it through. It dented the clay, and some letters I could turn over, but the others I had to smooth out the best I could. I wasn’t too thrilled about the rounded edges of the letters for some reason.

It’s something you can try with your art.

Christmas in July peace sign.
Christmas in July

They pretty much took over the plaque, but I was pleased in general. I made specialty tiles with red, green, and gold paint, just to make it Christmas-y.

It has been 100 degrees here so it’s hard to get into any kind of Christmas feeling…

The last mixed media village I made sold out, but I have four more houses available now.

Besides making my mosaics, I’ve moved deeper into the rabbit hole of clay figures. I can tell you it’s so much fun! You should try making some. It’s not that hard.

The faces are the hardest part, but the more you practice, the better they get. I also add a little bird to every figure I make. I just like birds a lot. All of my figures are for sale. You can check out my inventory HERE. I add more things every day.

Now go and make some art! 🙂

Lots of love,

Maria

Mermaid and Polymer clay

Mermaid(s) have been sneakily calling my name lately, and today I sat down and made a polymer clay plaque with a mermaid to attach to an old painting. I have several more projects in the making. two depicting mermaids. Here’s a picture of today’s project.

I had an abundance of blue shades of polymer clay and it was time to make something sea-worthy out of them.

I made a YouTube video of the process. You can check it out and see if it’s something you’d like to try. The video is 20 minutes long, but there are a lot of details to cover.

Please leave a comment if you feel so inclined.

What are you working on today?

Lots of love, and stay safe!

Maria

Spirit doll faces and more

Spirit doll faces are new to me. I have always wanted to try self-drying clay, but I know it doesn’t work well for my mosaic tiles. I did get inspired by cruising on etsy to try my hand at some free-form sculpted faces.

To finish them, I used the same process I use for painting mosaic tiles. I have a video on YouTube on how to paint tiles. VIDEO

spirit doll face

I had so much fun and they are pretty easy to make.  I used a purchased face mold and then sculpted the edges as I felt inspired.

spirit doll face

I could use all of my favorite colors!

spirit doll face

To get the imprints I used rubber stamps mostly. I also added some clay “hair” and the pieces fused well to the clay as it dried.

spirit doll face

I’m playing with making a doll in a shadow box, but so far, I’m not very happy with the result. Assembly with lots of materials is tough, but it’s always fun to try something new.

spirit doll

I’m using hand-painted fabrics, but nothing is finite in this picture. Just playing!

The faces are now available in my etsy shop Earth and Faery. 

I also made one of my mini shrines so far this week. They are pretty popular but somewhat labor intensive since every part has to be cut out and molded individually. 
spirit shrine

You are blessed indeed! 🙂

I’m having fun with clay and polymer clay.  What are you working on? It’s important to spend part of every day in the studio for art exploration = self exploration.

Let me know in the comments if you like the spirit doll faces. Thanks.

Have a creative rest of the week.

xo

Maria