The pros and cons become quite apparent as you work with the various clay brands. I’ll put down some insights here since I work a lot with the medium.
I started out with polymer clay, Sculpey III, which I still use a lot. There’s also Super Sculpey, which is a lot stronger than the Sculpey III. It usually comes in 1 lb blocks; I use it for figures and more complicated work.
The plus side of Sculpey is that it stays soft until you bake it, and you can work on it all day or even leave it for another day without worrying that it will dry out. The downside is the need for baking. Not that it’s a big con, but if you’re making sculptures (like I do,) you have to think of the inner armature. You can’t use anything that will melt at 275 degrees. If you do, the clay is likely to crack big time. (Been there, done that.) Also, if you live in a hot climate, the clay gets so soft as you work that you have to keep it in the fridge. When I need a chunk I have to run to the refrigerator– back and forth.
I have also made things out of air-dry clay, but the con is that it breaks pretty easily. I’ve made some spirit doll faces and bowls with it, but no sculptures. I tried the Plus brand from Joann’s, and it’s ok to work with but dries and cracks easily. I cover the item as it dries with a damp paper towel and that seems to help. I’ve also tried DAS, which is similar to Plus, but a step up in quality.

Recently, I took a clay sculpture class with Kathy Lewis, and she uses Jovi clay. I hadn’t even heard of it, but I ordered a block from Amazon. It smells like wet plastic, and it’s smooth to work with, but it tends to crack too, but not as bad as the other air dry clays. I guess practice makes perfect, but I don’t like repairing the figures. It makes me doubt that they are sturdy enough for sale.

I mostly work with Apoxie Sculpt, a super strong epoxy clay. Pros: it’s pretty easy to work with, but it takes practice. I have gone through several 2lb containers, and I’m ordering more! It smoothes easily to make a hard surface. It gives you confidence that the item won’t break easily. You can drill and sand it, and it takes paint well.
Cons: It’s expensive. You have to mix the two-part epoxy clay really well, and it takes a toll on your hands. You only have a couple of hours of work time before it hardens, and you can’t save leftover clay. I make small items with leftovers to add to other projects. I have used Apoxie Sculpt to fix items made with other clays.
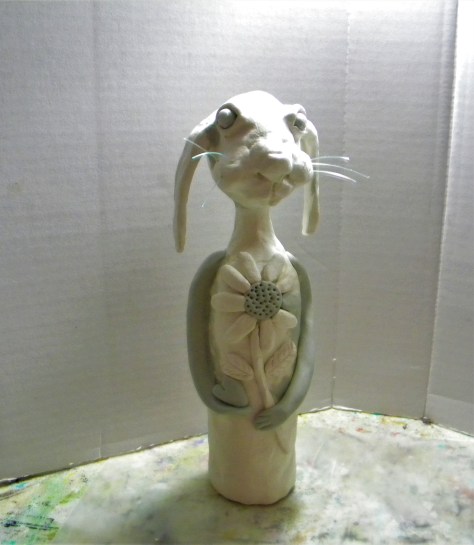
Here’s an example of a bunny I rescued. I started out with Jovi clay, and as it dried, the arms fell off and some of the other details. I added epoxy clay arms, fixed the cracks, and enforced the delicate area between the head and ears. Jovi dries white, and the epoxy clay is gray as you can see in the picture below.
I also had a bunch of dry eyeballs made with epoxy clay to use (to prevent any flattening if working with air dry clay.)

Below you can see the finished bunny, all painted and varnished. 🙂 It’s available for purchase in my etsy shop, Earth and Faery.

Here’s a link to Apoxie Sculpt on Amazon. (No affiliate.) You can also order it from the manufacturer: Aves Studio. It’s also available on Dick Blick. It also comes in smaller containers than the 2 lb tubs.
Conclusion: Sculpey is great for smaller items and is great for working details. I always use it for my mosaic tiles. I prefer epoxy clay to air-dry clay due to the cracking and easy breakage, but the preference is of course personal. I’d love to hear what your clay experience is like. 🙂
I have two classes using polymer clay: a whimsy girl and a mosaic tile box. Check them out.
Lots of love,

