Category Archives: Apoxie Sculpt

The pros and cons of various art clays

The pros and cons become quite apparent as you work with the various clay brands. I’ll put down some insights here since I work a lot with the medium.

I started out with polymer clay, Sculpey III, which I still use a lot. There’s also Super Sculpey, which is a lot stronger than the Sculpey III. It usually comes in 1 lb blocks; I use it for figures and more complicated work.

The plus side of Sculpey is that it stays soft until you bake it, and you can work on it all day or even leave it for another day without worrying that it will dry out. The downside is the need for baking. Not that it’s a big con, but if you’re making sculptures (like I do,) you have to think of the inner armature. You can’t use anything that will melt at 275 degrees. If you do, the clay is likely to crack big time. (Been there, done that.) Also, if you live in a hot climate, the clay gets so soft as you work that you have to keep it in the fridge. When I need a chunk I have to run to the refrigerator– back and forth.

I have also made things out of air-dry clay, but the con is that it breaks pretty easily. I’ve made some spirit doll faces and bowls with it, but no sculptures. I tried the Plus brand from Joann’s, and it’s ok to work with but dries and cracks easily. I cover the item as it dries with a damp paper towel and that seems to help. I’ve also tried DAS, which is similar to Plus, but a step up in quality.

Recently, I took a clay sculpture class with Kathy Lewis, and she uses Jovi clay. I hadn’t even heard of it, but I ordered a block from Amazon. It smells like wet plastic, and it’s smooth to work with, but it tends to crack too, but not as bad as the other air dry clays. I guess practice makes perfect, but I don’t like repairing the figures. It makes me doubt that they are sturdy enough for sale.

I mostly work with Apoxie Sculpt, a super strong epoxy clay. Pros: it’s pretty easy to work with, but it takes practice. I have gone through several 2lb containers, and I’m ordering more! It smoothes easily to make a hard surface. It gives you confidence that the item won’t break easily. You can drill and sand it, and it takes paint well.

Cons: It’s expensive. You have to mix the two-part epoxy clay really well, and it takes a toll on your hands. You only have a couple of hours of work time before it hardens, and you can’t save leftover clay. I make small items with leftovers to add to other projects. I have used Apoxie Sculpt to fix items made with other clays.

Here’s an example of a bunny I rescued. I started out with Jovi clay, and as it dried, the arms fell off and some of the other details. I added epoxy clay arms, fixed the cracks, and enforced the delicate area between the head and ears. Jovi dries white, and the epoxy clay is gray as you can see in the picture below.

I also had a bunch of dry eyeballs made with epoxy clay to use (to prevent any flattening if working with air dry clay.)
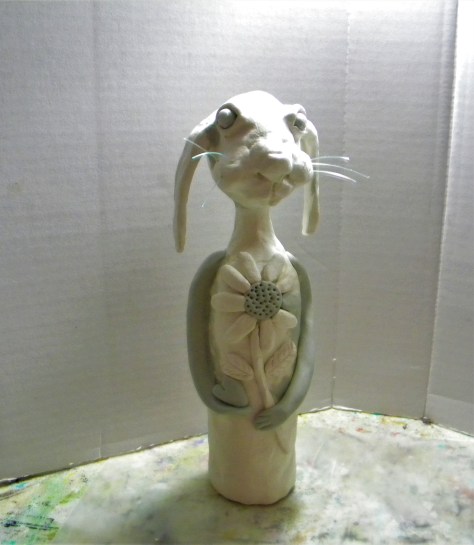
Below you can see the finished bunny, all painted and varnished. 🙂 It’s available for purchase in my etsy shop, Earth and Faery.

Here’s a link to Apoxie Sculpt on Amazon. (No affiliate.) You can also order it from the manufacturer: Aves Studio. It’s also available on Dick Blick. It also comes in smaller containers than the 2 lb tubs.

Conclusion: Sculpey is great for smaller items and is great for working details. I always use it for my mosaic tiles. I prefer epoxy clay to air-dry clay due to the cracking and easy breakage, but the preference is of course personal. I’d love to hear what your clay experience is like. 🙂

I have two classes using polymer clay: a whimsy girl and a mosaic tile box. Check them out.

Lots of love,

Paper clay bowl with painted mandala

Paper clay is so much fun to work with. I don’t know the difference between paper clay and air dry clay, but they are both easy to work with. I like to make little bowls and paint them. It’s actually relaxing and satisfying to paint funky patterns without pre-planning.

I use Plus paper clay:

paper clay bowl

I roll an amount that I think will be enough for a small bowl. I roll it with a baking pin that I usually use for my polymer clay. I try to get the thickness even by eyeing the clay since I don’t have clay “bars” that help to make an even thickness. But handmade doesn’t have to be perfect!

I bend the clay over an object that will make the flat bottom I want. In my case, I used the bottom of an empty Mod Podge bottle. The bowl dries about 24 hours depending on how hot or cold it is.

Above are some examples of recent bowls. I made a YouTube video of my latest bowl, and you can watch it HERE.

I have also been making “heart guardians” from epoxy clay (Apoxie Sculpt) attached to rocks, shells, or geodes. They have been popular in my etsy shop. Here are some I made.

It has been fun to experiment with clay lately. I haven’t painted as much, but everything goes in cycles. I like to go with the flow of the moment. It’s challenging to make something different. I feel a lot of resistance, but when I press through that, I really enjoy the process.

I have some new items in my etsy shop if you’re interested. You can check them out HERE.

Please make your own paper clay bowl. I know you’ll love it! 🙂 You can’t go wrong with the process.

Lots of love,

Maria

fear is not your friend

Fear is not your friend unless it warns you to get off the railroad tracks as the train is coming. There are so many levels of fear, and the most insidious one is the fear that stops us from fulfilling our calling (to be artists or other forms of expression.)

I was talking to a friend who said she always wanted to be an artist. I could relate to her as I’ve always felt that way too. Then I felt so grateful that I had at one point decided to commit to the idea with action.

I know I would feel unfulfilled without it, and now, after many years, I think I have come a long way even though there’s no beginning or end.

I was reading this book: Wild Ideas, Creativity From The Inside Out, by Cathy Wild, and I saw this paragraph that so hit home with what I’m saying here.

“If you want to create, you need to become an explorer. An explorer may be an astronaut living in a space station or a pop songwriter attempting to compose an opera or a former welfare recipient heading off to a first day of work. As an explorer, you must want to find out what lies beyond the boundaries of what you already understand and what you already know how to do.”

You can find the book on Amazon HERE. It’s well worth a read.

So, to be an explorer, you have to keep an open mind and be willing to come across resistance, which is inevitable. Have a conversation with it and ask why it has arrived to instigate reluctance to create.

It will likely say: “If you go down that path, you will only encounter trouble that you can’t handle” In other words, it’s spreading fear and tries to tell you you’re inadequate.

As an artist, you’ll come across that every week, or even every day, if you’re serious about commitment and showing up at your work table or easel.

Working a regular job, you come across problems that need to be solved, right? However you solve your problem, you just do it, or you get fired (worst-case scenario.) If we bring some of that determination into getting past the things that stop us from doing something we love, no problem or resistance can stop us.

Then comes a time when you have to grow out of the comfort zone as an artist. The way I deal with that is to try many different things, materials, and styles. It’s like walking through the jungle with a small machete. You don’t know what you see until you come right up to it. Sometimes you say no, this is not for me, and other times, something pushes you to keep going with the new material.

Frustration = fear = learning curve

Make frustration your best friend! When you feel it the strongest, you’re on the verge of a discovery, so keep on going, past the fear. Honor the learning curve! Anything new has to be learned, and there will be many failures, but those are steps to getting to the place where you’re happy with the result.

Whimsical dog made from epoxy clay and paint
whimsical dog
Crystal wand made with oak wood, crystals, and epoxy clay.
Crystal wand

What you see above are items I made with epoxy clay, which for me has been really hard to work with. I really love the durability of the clay and how it dries rock hard and attaches to pretty much anything. I have worked quite a while with it, and had to throw out some things that did not work out at all.

You know it’s a learning curve, so you continue.

Do not stop when the going gets tough

If you stop you’ll never know if you could master the challenge.

If you stop, you’ll beat yourself up for not going to the finish line, no matter how “ugly” the art turned out.

I haven’t mastered the epoxy clay (Apoxie Sculpt,) but I’m working on it, and every item teaches me something. I look at videos on YouTube by people who have mastered the clay, and I go, wow, I want to be that good too. Some day, I will! 🙂

My point is: don’t sabotage your dreams, don’t sell yourself short, give your dream a chance! Please. Commit and start making art. Copying other artists is okay in the beginning.

Lots of love,

Maria

P.S. I have many new items in my etsy shop, Earth and Faery. Some of them are not all perfect, but people seem to like them anyway. 🙂

What is holding you back?

What is holding you back? Fear? Excuses? They are all one and the same, and it sums up to fear. When it comes to creating any kind of art, fear is a constant companion, usually in the shape of resistance.

I wrote a post about resistance and it’s worth a read if you’re not getting anywhere with your art. Lately, I’ve heard a lot of excuses why people don’t create even though they want to at heart.

I suffer from resistance a lot, especially when I’m trying some new art supply or style. Recently, I picked up some tubs of Apoxie Sculpt. (I wrote about it in my last post.) I debated then to put it aside, but I decided to try some more projects with that type of clay. It’s still frustrating to work with, but I have persevered.

Since the clay is pretty expensive, I try to use as many shapes underneath as I can and then cover with a thin layer of clay. It makes it less heavy as well. I bought some styrofoam balls, and to form the body of the birds below, I used one large for the body and one small for the head. I used popsicle sticks, broken in half, to form tails and necks. Here are the end results, a couple of circus birds on “wheels.”

They were fun to make. I used blocks of wood that I covered with papers and wooden wheels. The legs are 19 gauge steel wire. It was a challenge to make these birds, but why not stretch oneself, despite the resistance?

If fear is holding you back…

The only way to overcome it is to do the thing you’re afraid of. Otherwise, it will haunt you. I know this well from previous experiences.

I have found I like making art assemblages. I had to use a drill for simple holes, and it felt awkward and new, but maybe it’s the beginning of new fields of experience.

Don’t let fear hold you back if you want to renew your life, your experiences. It’s not just artistic expression. It’s so easy to stay in the comfort zone, but life gets boring in the long run.

To mix things up, even more, I prepped a bunch of canvases for later use. I love to add mixed media as I go, and I even finished one project when I saw a robust lady emerge from the layers.

A mixed media art project with layers of paper and paint.
Is fear holding you back?

I also made some of my usual objects for sale in my Etsy shop these last few days.

I love the little mosaic Virgin Mary shrines, and now I have used my last Altoids tin!

It’s time to be brave! Make the time to be an explorer, kick the excuses to the curb. Every day is another opportunity for fun creativity.

Lots of love and wishes for happy creativity!

Maria

My word for 2020

My word for 2020 is faith. It takes a lot of faith to blaze new trails in the wilderness of creativity. I feel inspired to move on, create things I’ve never done before.
First, I have a little inspiration for you, the process of my latest art journal spread:

Art journal pages tutorial with floral napkin and writing.
My word for 2020

I started by applying a paper napkin to the bottom half of the pages, using Mod Podge. I separated the two layers of the napkin first, and the top layer was very thin, making awesome crinkles in the paper when I attached it to the page. I then painted the top part an unbleached white and used an old gift card to scrape some green over the dried paper napkin.

Adding a paper napkin to my art journal
adding paper napkin

You can see the ridges in the napkin well, and where there is a paler area in the white paint where the Mod Podge acted as a resist, adding more interest to the page. I like how the flowers on the napkin shone through, making me think of spring.

I added stems from my stash of paper. Friendship sayings were printed on the paper, and I thought they would add more interest to the art. I cut out flowers from other stashed junk and glued them all down.

paper flowers added to my art journal spread
cut out paper flowers

I enhanced the stems and flowers with black lines from a ballpoint pen and wrote down my word for the year. Simple but fun!

my word for 2020 is faith
my word for 2020

I have dipped my toes into other media as in sewing. I’m obsessed with textile birds at the moment. Using two Ann Wood patterns that you can find at Annwoodhandmade.com, I made a songbird and an owl. Lots of fun, but also some frustration when things didn’t go so well.

Pink songbird made from scrap textiles.
Pink songbird

This debonair gentleman is called Sir Percival. He has lots of wisdom and goes his own way, but is always willing to offer a word of encouragement. He has lived a long life, and he likes to read books.

He’s fashioned from soft materials, but he’s not a toy. He’s an art doll enjoying lording it over other dolls, but he’s kind.

These two birds are for sale in my Etsy shop. You can find the owl HERE. The songbird is available HERE.

Apoxie Sculpt is of the most difficult materials I’ve worked with. I like the incredible hardness when dry, but it tends to be too soft, and if you wait, it gets too hard to work with. You only have a couple of hours of work time with the clay. I haven’t found the sweet spot yet.

I finished the bird I made a couple of weeks ago, painted two layers of paint and fixed the wobbly leg. It came out ok, but the turtle I made with the amethyst crystal did not end up as planned, but I’m learning. The clay is so different from polymer clay or paper clay. Since the end product is so much stronger, it’s worth learning how to handle it correctly.

The main thing is to have fun!

I hope you’re having fun this week. Make sure to add some creative practice to your day. Every day is a gift. Make it juicy!

If you missed my last post, here it is: Person or bird? I made some molded faces with Apoxie Sculpt and sewed them to fabric bodies. What do you think?

Happy creating,

Maria

Person or bird?

Person or bird? You have to make up your own mind. 🙂 I have been interested in Apoxie Sculpt for a long time, and finally took the plunge and bought the materials needed for this kind of clay exploration. So I made a face. It looks just like my other clay faces with the exception of hardness. Wow, what a difference! You can sand and drill Apoxie, it’s that strong.

Person or bird
Person or bird?
Apoxie Sculpt face

If you want to try Apoxie Sculpt, watch some YouTube videos on the process and wear gloves when mixing the two parts. There is a safety video to watch too. The fumes are not dangerous, but you can develop skin irritation from handling the compounds. I found it hard to sculpt with gloves on! Now I have to find the best gloves to use.

Here’s another face I made, and she became a spirit doll.

spirit doll with Apoxie Sculpt face
Spirit doll

I tried my hand at armature, a first for me. Using aluminum foil I fashioned a bird and added some wire legs. Then I rolled out some Apoxie Sculpt and added thin layers all over the bird. It has 1-3 hours working time, which was tricky. It’s very soft at first, and then it hardens as time passes. I found that the little bird I made on top collapsed because it was too soft. It was hard to work with at first. The whole thing hardens to rock in 24 hours.

Apoxie Sculpt bird
Apoxie Sculpt bird

I need to work on the timing of sculpting different details. Practicing often is the key. 🙂 I discovered that it takes paint very well. On polymer clay, you can rub off the paint if you try hard, but with Apoxie, it’s solid. That made me very happy since I love to paint my pieces.

It was fun making the soft sculptures with some primitive stitching and poly fill. My sewing machine is cluttering up my kitchen table, but before I put it away, I might make some more sculptures. It’s always good to stretch creatively.

I’m tempted to make another crow sculpture as in my previous post.

I’m a bit intimidated by the work involved. The most fun part was painting, dressing, and adding the accessories. I’m not a good seamstress so sewing the body was a struggle.

Making a crow spirit doll
Crow spirit doll

Anyway, Christmas is almost here, so it’s time to close out this year’s blogging, but I’ll be back next year with more tutorials and fun stuff. 🙂

I had a lot of sales in my etsy shop for the holidays, but there are so many things to browse, and I add more stuff all the time. Take a gander: Earth and Faery.

I wish you a Merry Christmas and a very Happy New Year. I wonder what this new decade will have to offer. I’m sure it’s not going to be boring…

Peace and love, Maria