Tag Archives: make your own

Mixed media greeting card tutorial

Mixed media cards are easy to put together. I have so many fabric and paper scraps that I could wallpaper an entire house! I often think about what to do with them as I don’t throw much away, especially the hand-painted fabrics. I have used most of them, so now I have mostly scraps. Why not make some handmade cards and give them along with the gifts to friends?

Two benefits from that: You have fun making the cards, and then passing on the joy (hopefully.) If they don’t like a handmade card, they can “gift it forward.”

The Queen of hearts

I came up with a combo of fabrics and paper to make this Queen of Hearts card. I have many watercolor paper pads, and I don’t paint with watercolors so I’m using the heavy-duty paper in many other ways.

I cut one 9×12″ sheet in half, and then I used a bone folder to press the two pieces of paper into cards. You can also buy blank cards with envelopes at the craft stores.

mixed media base: watercolor paper
Mixed media base

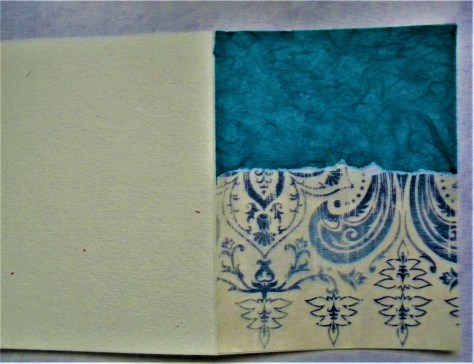
I flattened the card and covered it with a paper background on one side. I like to use cool colors to create backgrounds, so I chose blue tones.

mixed media background

I used an old rubber stamp I have of a female face to print onto tan cotton with Stazon deep purple ink. The face looks grayer in the pictures.

mixed media face
mixed media face

To frame the face I needed bolder tones, so I layered some paper outlines. I started with black, and then used some gold wrapping paper as a halo. I added some paper light beams in yellow for more drama.

Mixed media background
mixed media details
mixed media details
mixed media details

I used some hand-painted fabric for the gown and attached it along with the face that I cut from the fabric.

mixed media card
mixed media card
mixed media embelliishments
mixed media embellishments

It’s all in the details!

I added small touches, like a red /pink heart, some “wings” and some do-dads at the bottom. I also decided to cut out a small bird from a piece of paper to attach across the top circle.

mixed media embellishments

Added drama

I used black Stazon ink to color the edges to give the card a faint frame. I used a light touch. I also outlined the bird and the heart with a ballpoint pen to make them more pronounced. As you can see, the red bits gave some spark to the card.

There she is, the Queen of Hearts. It’s a good idea to stamp some words inside the card or write a personal message. In my opinion, it makes a great gift to someone you care about, but I might be biased, haha. A suitable caption might be; “Queen for a day, Happy Birthday!”

I used the same watercolor paper to make this simple art journal. Check out the tutorial in this post: Make your Own Art Journals.

If you are in a crafty mode, check out my tutorial on how to make a Spirit Box.

If you feel like making a Spirit Doll, I have faces for sale you can use. They are available in my Etsy shop: Earth and Faery.

Have a great creative weekend!!

Lots of love,

Maria

Crafty girl’s guide to art journal making

Crafty girl’s guide is a way to save on your art journals. Most of us mixed media artists drool over Moleskine and Strathmore brands, and many more, but they make a big dent in our wallets too.

Not that it’s bad to spend on good art materials. I do spend, but sometimes I like to make my own journal because it has “me” branded on it, not spiral binding or ugly covers.

I like to embellish the store-bought covers, but it’s something special about making your own.

I have even made some to sell in my etsy shop because beginning art journalers sometimes have a hard time with the blank page, so I make some simple backgrounds on the pages.

I buy watercolor paper on sale and take the pads apart for easy art making.

Then I fold the painted pages and use a bone folder to flatten the crease as much as possible. I sew the pages together with embroidery thread or hemp string.

The reason I like embroidery thread is that it’s colorful and strong, and flexible.

Crafty girls know how to be creative with the backgrounds in the journal. The more you create, the more your creativity blossoms.

Make your own!

crafty girl's art journal making
crafty girl’s journal

This is the latest journal I made. I covered the front and back with some vintage paper. The cover can be painted or more ephemera added on top. The label can be affixed anywhere or left out.

So much fun!

crafty girl's guide to art journal making

Above is a sample page of a background, and below are a few more. As you can see, crafty girl’s can make this EASILY!

crafty girl's guide to art journaling

crafty girl's guide to art journaling

So easy… A while back I made a video on how to put the pages together into a journal.  HOW TO VIDEO.

I have written some posts about art journaling basics for you. CLICK HERE TO READ.

ART JOURNALING STUFF (mostly cool backgrounds.)

If you need a push, here’s another post about the importance of allowing yourself to make art. BEGIN NOW! 

Now you can make your own journal and get started with art. There are no excuses and there is no time to lose. If you love art, make some today!

xo

Maria

P.S. I made a simple e-course on how to make a variety of art journals. It’s for the crafty girl in you! 🙂 CLICK HERE. 

You can also visit my etsy shop for more journals if you don’t want to make your own. EARTH AND FAERY


Make your own art journal

Make your own art journal is easy. I actually put up an e-course on how I made a similar one to the one below.  (Link at the bottom of the post.)

make your own art journal

I love making stuff, and experimenting with materials, mostly paper and fabric.

I hand “painted” the muslin cover with acrylic paints and alcohol inks, let it dry, and then I ironed it flat. I used a manila folder that I cut to size to fit the pages I made. I also made sure the muslin covered the inside of the cover. I got lucky because it did!

Then I proceeded to deckle the edges of 34 sheets of card stock in various colors.

deckle edges
deckle edges

I then wet all the pages and dribbled or poured paints and inks on them, and the effect is always fun when paint runs in the water.

ink and acrylic paint

alcohol inks
alcohol inks and acrylic paint


acrylic paints
acrylic paints

It is very rewarding to make your own journal, to be part of the entire process of making it your own and then filling it with art and writing.  Modern day journaling… I think we long for expression, something to keep us in touch with what we REALLY feel.

So much time is lived behind the mask that society expects from us. Art is a great way to express your innermost thoughts and feelings, and some stuff you didn’t even know was in there. 🙂

Art is healer and a challenger. Why not go for a wild ride and claim your innate creativity? Everyone is an artist and that’s the truth.

Everyone knows how to express themselves, therefore there is an ability to express in art.

The above journal is available in my Earth and Faery etsy shop. The link is EARTH AND FAERY. SOLD right away, but you can still make your own. 🙂

If you want to check out the e-course how to make three different kinds of art journals, go to THIS PAGE.

I wish you a great, creative weekend!

xo

Maria

Save

Save

Make your own art journals, easy tutorials

There is a special feeling of satisfaction after you make your own art journals using your unique style. Art journaling will be less intimidating when you’re not faced with a book from the store filled with glaring white pages.

When you make your own, it becomes “friendly,” something you have gotten to know during the creative process and that you enjoy working in afterwards.

shabby chic art journal


ledger art journal
ledger style art journal


altered books
altered books art journal

If you have questions about materials and procedure, I can help you.  In this e-course you will learn how to:

  • use fabric in your art journal
  • paint and dye fabric without fabric dyes
  • age paper
  • add fun details to your journal
  • use old books to alter using your own style
  • make mini journals that will fit in your purse
  • use tips and tricks to add your own touches
  • be creative with the materials you already have
  • inspire your creative process in general

To participate in this e-course you don’t need any particular artistic skills other than your hands and some art supplies. If you don’t have all on the list, use what you have.

We will make a shabby chic cloth-bound journal, a ledger style journal, and alter two picture books with unique pockets.

You will receive three detailed videos and a PDF for parts that I could not film.

To find out more GO HERE.

I would love for you to come and explore art journaling with me!

xo

Maria