Category Archives: art

How to make a studio mess

How to make a studio mess is so easy, but it’s really hard to sort and clean, and the floor, to say the least, is a disgrace. However, on the bright side, I created many cute things in June. It was sweltering outside every day, so I spent most of my time in air conditioning.

June was a month of diversity. Lately, I’ve been obsessed with crocheting, so I made a blanket. I started it in April, but I worked on it every day, and I love the design: The Fruit Basket blanket designed by Janie Crow. She’s an amazing designer, and I recently ordered the yarn to make her Lily Pond blanket next.

Here’s my blanket, but it still needs blocking to get all the kinks out.

The pattern was difficult, especially since I only knew basic crocheting at the start. But they say discipline is a virtue, so I stuck with it, and I learned a bunch!

Studio mess

I have been making dioramas lately, and those are so much fun. Here are a few examples. Many of the components are natural, things I picked off the ground.

I wish one of my three black-and-white cats could garden (especially weeding!) The last two dioramas were made from one paper mache box that I covered with plaster. The lid became the frame for an angel, and the box with the cat, a garden. I shaped that box a bit to make it less deep. Too deep and it gets dark at the back even if it’s painted white.

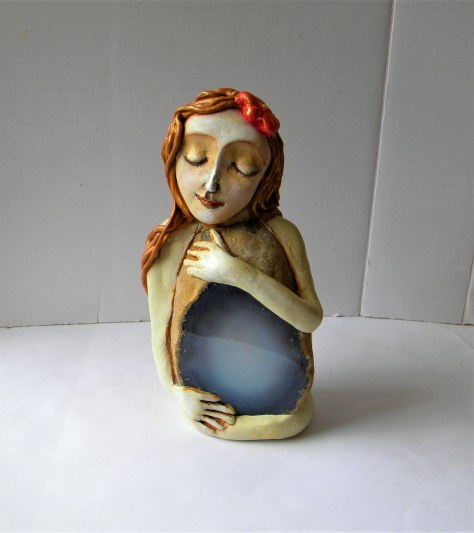
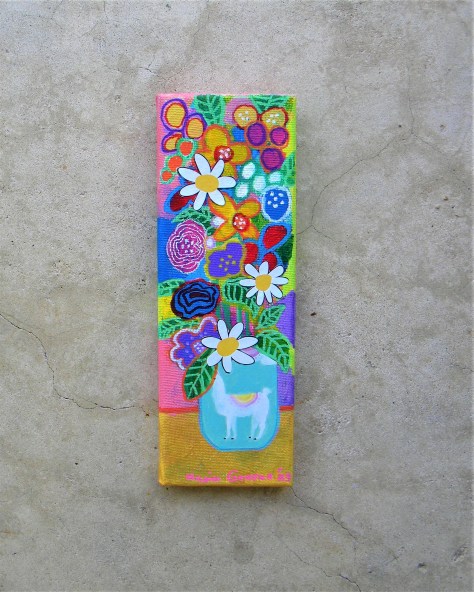
All these items are available in my etsy shop EarthandFaery.

I started painting a clay bird this morning and realized I didn’t like the colors. I was going to list it in my shop along with its sister waiting patiently in the background, but it’ll have to wait.

So that’s what’s going on around here, ugly birds and pretty birds.

I will have to clean since the actual workspace is getting smaller and smaller…

To put off the inevitable, I might use the rest of the yarn from the blanket and make some pillows…

I wish you a creative July! Happy 4th!!!

Maria

Tutorial on how to make a plaster angel

Tutorial on how to make a plaster angel out of an old tin and twigs for legs. There are a lot of pictures, and I will explain every step of the process.

List of materials

  • An Altoids tin or other tin with a lid
  • two sturdy twigs
  • plaster strips (can be bought on Amazon)
  • a flat stick
  • aluminum foil
  • masking tape
  • sandpaper
  • sealer
  • acrylic paints
  • clay face, polymer clay or air dry clay
  • Apoxie Sculpt or other epoxy clay
  • a piece of cardboard

I began the process by making a hole at the top of the Altoids tin and two holes on the bottom using an awl. On the bottom part, I pushed in the awl as far as it could go to get holes large enough to insert the twigs. You can use a drill, but you would need some clamps to hold the tin in place.

I used aluminum foil to keep the flat stick and the legs firmly in the tin, and then I sealed it with masking tape, making sure to tape the legs firmly to the box.

Then I wrapped the whole thing with strips of plaster. Use a separate bowl for water (not your water coloring bowl) to dip the strips, and put a protective sheet under the plaster. I used newspapers, but you can use plastic. Keep in mind that plaster is dusty and messy. The plaster will stick to itself, not the tin, so you need strips that are long enough to wrap around themselves. Note: wash your hands in the bowl when done, not under the faucet until most of the plaster is removed. Do not empty plaster water into the sink. I pour it outside, but you can let the plaster sink to the bottom of the bowl, and the next day (or so) pour the water down the sink and scrape the plaster into the trash.

(Sorry about the blurry image.) I wrapped the plaster especially tight around the top of the legs and the flat stick, several layers of plaster. Then I let it dry. If it’s cold to the touch the next day, it needs to dry longer. When completely dry, sand it lightly with some sandpaper, and seal it with two layers of sealer. I used Liquitex matte medium, but any sealer will work.

How to make the wings

I used 19 gauge annealed steel wire for the wings. See picture for how I bent it to form a figure eight (sort of.) The twisted part in the middle will act as the wall hanger. Bear in mind the wire will rust in contact with wet plaster, but I liked the effect. You can use aluminum wire if you don’t like rust.

Then I covered the wings with plaster and let them dry.

I worked on two different angel sculptures so the pictures are a bit mixed bag.

Re clay faces

I made the faces from polymer clay and painted them with various layers of paint. I have a tutorial on YouTube on how to paint faces. You can sculpt a very simple face out of clay and paint it. VIDEO LINK.

I added a piece of cardboard to the head for a headpiece and to hold the face in place. I mixed some Apoxie Sculpt to make a thin layer for a halo and stamped it with a rubber stamp. I rolled a piece of clay to stick on the back of the face to attach to the clay halo. I also added a flat piece of clay to the back of the cardboard.

When dry, you could see the flat stick through the clay, so I added another layer over it. Epoxy clay takes about 24 hours to dry completely. I also added clay to the wings to attach them to the body. Glue doesn’t work well on plaster even if it’s sealed, so go for some kind of epoxy clay.

My second doll is below.

The hearts on the chests of the two angels are made from Apoxie Sculpt and then painted when dry. I used raw sienna to paint all the edges of the tin and wings to get an aged effect.

Then I used unbleached titanium white and titanium white in layers to cover the body.

I sealed the angels twice when dry, painted the heart embellishments on the chests, and added some sweet affirmations from a Tim Holtz book of inspirational quotes. Two happy angels!! 🙂

They are available in my etsy shop Earth and Faery. Please check out my other art items for sale as well. 🙂 Thank you for reading this far. If you have questions, please post them in the comments.

Using a stretched canvas in a creative way

Using an already stretched canvas for a different type of wall art inspired me to make this project:

The deep-edged canvas is 6×6″ and the back has a “cavity” that I used for displaying the figure.

I don’t have any pictures of the process, but it’s not hard. I covered the canvas with many layers of tissue paper that I painted and distressed with paint washes of various colors. The front is a window made from cardboard and plaster strips. I like the way the plaster makes lots of texture. I slathered on a layer of wet plaster on top and let some of the strips bleed through.

I added some tissue paper over the dried plaster and painted the front to look like the back. Then I added some positive affirmations to the sides. I formed a box inside the back of the canvas from cardboard and added tissue paper to get some texture. I then painted it with a burnt sienna wash.

The figure was the hardest part since it had to fit inside the opening. I used a styrofoam ball that I cut in half for the head and added a torso of crumpled foil. I covered the whole with epoxy clay and sculpted the hands, face, and heart. After it all dried, I painted the figure with acrylic paints.

Epoxy clay will adhere to just about anything, so it was easy to fix the parts to the main figure. I then sprayed the whole thing with glossy varnish and put a hanger on the back.

It is available in my etsy shop: Earth and Faery.

Making clay bowls

I had a bunch of air dry clay that needed to be used before it dried up, so I made some bowls or dishes. When they were dry, I painted mandalas on some and sculpted a face with wings on another. That one has some interesting vines on the back. See the pictures below.

I added a YouTube VIDEO on how I paint the mandala on the clay bowl.

A strange bird

I also made this strange bird this month…

I look back on September and conclude it was a good month even if I didn’t make as many art projects as I normally do. I’ve been trying to think outside the box and challenge my creativity. It’s exciting but also difficult.

In one project I was trying to pour resin over a picture that I had enhanced with “jewels”. It turned out that they were plastic and mostly melted making the resin turn blue. The jewels turned into flat mirror disks, and the project was ruined. Live and learn. I don’t use resin much since you can’t fix the booboos, but it’s an intriguing medium.

I wish you a very creative and happy October!! 🙂

Lots of love,

April was a good and busy month

April was good though I went through a lot of changes with my art. I resisted painting my fantasy flowers even though they were fun and oh-so-colorful!

I always feel I should paint something else after painting five or six of the same motif. Do you feel that way too, or do you love to explore the same motif until you’ve excavated all that it can give you?

After these two paintings, I went in a slightly different direction:

Still flowers though, inspired by spring no doubt. Then I went in a different direction:

The still life was great fun, so I’ll explore more of that style in the future. It’s funny how art goes in various directions if you let it lead you. I feel that I’m always learning more, and that will never end.

I also had time to make some clay sculptures, which is always an effort in trial and error. This “cage” doll started out as a thrifted candleholder. It took me a while to finish, but I was happy with the result.

The one below is built around a blue agate geode. I used Apoxie Sculpt for both sculptures.

All of these items are available in my etsy shop Earth and Faery.

I also made some narrow flower paintings / collages, which was fun. I usually don’t paint tall and narrow, so it was a challenge.

We’re coming into the hot months here in Florida now, so I’ll be spending more time indoors to escape the heat. I’m pondering more art classes to add to my class site. I have two available now: How to Make a polymer clay whimsy girl, and How to Make a mosaic box with clay tiles.

You can check out those offerings HERE. I’m gathering supplies to make spirit dolls using my sculpted faces, and I’m thinking about designs. I will make several dolls in the course.

I made a simple, mostly no-sew, one a while back on YouTube that you can check out HERE.

What have you been working on lately? A day without making art is partially a wasted day in my opinion, but we do the best we can.

Lots of love and inspiration to you!

Doodle art mania in my studio

Doodle art mania has been happening here in the studio lately. I took some watercolor paper and cut it down into postcard rectangles. Then I watered down the surface and added acrylic paints and inks to get some background to doodle on.

I made a YouTube video of the process. Each postcard is unique, and I doodled where I saw movement in the background paint. You can find the video HERE.

The whole process is straightforward, and all you have to do is add your own doodling style to the background. I used permanent markers for the doodle: Sakura Micron03 black, and Faber Castell Pitt artist pen brushes. I also used Posca pens and Elmer’s Paint Pens. At the end, I sprayed the surface with acrylic varnish.

Doodle art mania

I’ve also been making Santos cage dolls, but I have to make those in stages since the epoxy clay takes 24 hours to dry. It’s not easy to work with, but the clay is so strong when dry that I like to use it for larger projects. Normally, I use polymer clay, which you can use for this, but the armature has to be able to stand the oven temperature.

In my last blog post, I wrote about the process of making a cage doll. I finished that project, so here’s a picture:

It turned out okay in the end. 🙂

I look back on the month of March and realize I made a lot of items even though my creativity seemed so slow. I made a truly funky chicken sculpture and some cute cat sculptures.

Funky chicken

At Michael’s, I found some rustic-looking wood panels that were painted white. I figured they would look cute with a metal hanger and my handmade clay beads. I painted a couple of flower bouquets, and the hangers looked cuter than the hemp string Michael’s offered as a hanging mechanism. What do you think?

The first one sold right away, and I’m grateful for that. I have many repeat customers in my etsy shop, and I can’t be anything but grateful!

My shop has many new goodies, Earth and Faery.

Despite my resistance, I make the choice to paint or make something in my studio every day. I used to get excited when I saw clean, drying paint brushes by my sink–oh, the possibilities–but these days, I’m happy if something turns out well.

New procedures are always scary, but think of the knowledge gained from venturing onto unknown paths! 🙂 Creativity is an ongoing lifetime exploration.

When all else fails, doodle something…

Doodle art mania

Let’s make more art stuff in April. That’s my intention. Maybe I’ll try something new. I bought the book Plaster Studio by Stephanie Lee and Judy Wise. I’m going to try my hand at making a bowl with plaster strips. Maybe I’ll have a picture for my next blog post.

I have some perennial polymer clay classes you can check out HERE.

I wish you lots of inspiration this spring!

Lots of love,

Fear of failure

Fear of failure anyone? I have experienced a lot of resistance lately as I’ve been stretching myself to create more complicated sculptures. I have always enjoyed making them, but if I make too many of the same style, I get bored. I have been wanting to make more Santos cage dolls, and I found some interesting “stands/cages” at a thrift store. They were probably part of wall sconces in the past, but I could see their potential.

Possibly a wall sconce in its prior incarnation

I used one of them for the first cage doll. To make them look a bit less modern, I wrapped and glued all the parts with sewing pattern paper.

Anything to make the process easier (than making a cage from scratch.) If you’re handy with wood and nails, go for the traditional cage. There are videos on YouTube.

The hardest part is to visualize the doll on top of the stand. I went for a longer dress but, traditionally, the cage is the “skirt.”

I use epoxy clay (Apoxie Sculpt brand) for these sculptures because it’s very strong.

The resistance/fear shows up questioning if the sculpture will be any good. Will I come up with a design I like? What if I waste all that pricey clay and have to scrap the project?

The doubting imp is always lurking on the outskirts of my mind. I am well-versed in the Fear of Failure! 🙂 There’s always uncertainty when you start a new project, especially if you have never made it before. They say that fear is the only thing that stops us from moving down untrodden paths. BUT, they also say that if you can visualize the project, it’s already done.

Fear of failure project

The choice is: do I go into the studio and start (or continue what I started?) Or… do I clean the fridge? There are always dirty areas to clean in the home.

The fear wins out often enough, and lately, I’ve had a very clean house, haha.

But, ultimately, the sculpture won’t go away, so I surrender to the process wherever it wants to take me. More often than not, the end result is okay, and if it isn’t, the sculpture can be used in another project. (Hope springs eternal…)

I have many ugly parts that I repurposed or took apart for elements for other projects.

The silver lining is: I learned something during the process that I can apply to future projects.

The more I listen to the urge to create “no matter what”, the more insights and experience I gather, and that’s priceless!

I leave the fridge cleanup for another day. That will always be there, but the exciting inspiration breeze from the muse fades away if I don’t use it.

Fear and resistance will never go away, but we can choose not to listen to them!

Uglee hands

I’m okay with this sculpture, but I need to work on fixing the hands and the hearts. One thing about Apoxie Sculpt, it is super soft when you mix the two parts together. I let it sit for about an hour before I use it, but then you have to work quickly. The good thing is you can build on top of the clay without a problem. I also have to attach another heart, and work on the one that “collapsed.” I will add another heart on top, and no one will be the wiser. 🙂

Have a wonderful, creative week.

Lots of love,

Maria

If you want to learn how to make one of these polymer clay sculptures, visit my Whimsy Girl workshop HERE.